Showing posts with label 3d print. Show all posts

Tuesday, June 30, 2026

Defend the castle!

 For YEARS (honestly, decades) I've had the aspiration to do a castle fight. I have a campaign I downloaded off the internet of a desperate defense of a fortified town/village near Sylvania but a group of mercenaries (why yes, it does use Mordheim). One day it may see the light of day. 


With my list of 'things wot I need' I stumbled across some cool stl's early in my printer ownership and progressively printed a bunch. It sat unpainted for much time. Then I swapped some painting with local gamer Garret. He usually zenithal highlights and inks with a home mix to get a satisfying stone look that I dig. 


The impetuous to finally finish the stuff  occurred with the plan for enfilade 2025. I knew I wasn't going to make it for a variety of reasons (childcare, car that can't survive freeway speeds, geopolitical tensions, etc). But I would be able to contribute to the success of the game for my gamer friends who go yearly (and come up to Canada each summer for a game). Seth, conveniently, was up in Vancouver for rugby the same weekend I went to Trumpeter Salute at the Bonsor club and I managed to pass off a castle to him to borrow. Trotting it over as a foot passenger on a ferry was the most challenging aspect of the process. 


York 867 was chosen to run a variant of '6's are bad'. That is.....roughly the name of the rule set. It's been re-skinned a number of times, but it's a great ruleset for people who feel like they roll an abnormal number of low dice. 


Wednesday, May 8, 2024

Star Wars Reinforcement; Probe Droids, Speeder Bikes, Zero G Troopers

 A bit late for May the Fourth, but I hadn't even been working on these for that reason. So....serendipity. Probe droids and the bikers are some found stls printed out. I had a couple of rounds of resizing to try and make them match my other figs (it's hard to size sitting folks and comparing them to slightly hunched rifle firing ones). 

The zero - G troops are some old sculpts from Ground Zero Games. I *think* NAC but could be mistaken. They are definitely the previous generation of sculpt and have languished in my pile o lead for a LONG time.


Wednesday, February 2, 2022

3d printing nerd gifts (4) - finished products

Doug works fast. The package arrived 8 days ago and he's already finished his tanks. I hope that he will forgive me in 'stealing' his pictures he sent me for a post. It's nice to have some continuity and see the final product in this series. I can't do better but heavily quote from the email. 


"Before I forget again, thanks for the support removal.  I was quite prepared to do that (had picked up some others in the past so knew what to expect).  it is a pain to do.


The StuG had a barrel replacement as the ink tube was a perfect fit.  I took your advise and coated the Valentine's with runny super-glue with a few coats and it did smooth out a bit. 
 
The miscast boogie wheel on the Valetine is not an issue as you can see I covered the track area with lots (and lots!) of snow - it is a Lend-Lease arriving on the Moscow front just at the end of 1941. This ‘evens-out’ my collection which now can accommodate 3 a side.
 
The StuG is to fight my t34-85 during the summer of 1943 also in Russia for some one-on-one action.   The side armor are plastic pieces which match perfectly with your print - your scaling is perfect!"


I will concur with Doug, removing supports is a bit of a pain. Certainly some are worse than others. Gotta say these look great, as does pretty much everything Doug ends up producing. 
Head over and take a look at his blog Dots of Paint for more.

Sunday, January 30, 2022

3d printing nerd gifts (3) - Tank Bodies

 Part three on my gift post is pretty brief as we've looked at slicers and supports. Now we just see something a bit larger and more complicated printed out. I attempted to place some supports within the track segments so EVERY SINGLE WHEEL wouldn't suck from overhangs. Unfortunately the support didn't work well (too narrow I think....I used a plugin for manually placing rods). This unfortunately meant there was some extra spaghetti around the tanks, but thankfully tank tracks are easy to weather to cover up the crappy printed bits. 


Most of this post is pictures with little of my usual long winded commentary. Strangely I omitted taking pictures of the StuG, but perhaps I figured it's just more of the same. Enjoy.

Ah yes, the 16hour print. I run my print jobs at a slow speed and thin layers to improve quality and avoid knocking them off the build plate. I've sorta had issues so this is a 'once burned, twice shy' thing. 

Thursday, January 27, 2022

3d printing nerd gifts (2) - Valentine Tank Turret

As part of the gift I'm printing for Doug (dots of paint blog) he also requested two tanks. We will look at some of the challenges of more complex shapes in this post. FDM printers sorta suck with undersupprted overhangs.....which is to say printing in midair works poorly. With an angle you can manage a gradual extension out without problems (such as an arched door). Otherwise you get big droopy loops and poor quality or worse. 


Supports, a throwaway structure connected to the ground/build plate which rise up to the unsupported part are the solution. Supports have their own challenge, besides the waste of material and time....they usually leave some cruddy artifacts where they connect. It is therefore key to choose the best orientation to minimize overhangs, or to make them where they aren't going to be seen well. For tanks, and me, that seems to be barrel up.

Our slicer, conveniently, shows in red where the overhangs are. This is based on a setting you tell it where your own printer/settings start to fail. For me it's about 60degrees. Note also that if you printed this without supports it'd fallover almost immediately and be a spaghetti mess in no time. You need a decent amount of contact with the build plate.

 Once again, I'm using a 1:100 model which requires me to remember to upsize it, and what percent to use.

 After slicing you can (and should) preview the print to make sure the computer hasn't chosen to do something wacky. Here we see the original structure in red (technically the walls are red and inside fill is yellow. We aren't looking at a cross section so we don't see the yellow right now). 

The blue is the support. It quite clearly illustrates how a throwaway structure is generated which will rise up to support the part of the model which are more than 60degrees off of vertical (such as the bump closest to us there is a pillar)

 Printed we see things look pretty decent. The barrel is a bit rough. I suspect this is due to flexing of the tall narrow structure so the small play in the material means perfect alignment doesn't happen and the layer lines are a lot more obvious.

More photos without commentary to follow. Note the final picture gives you a sense of the type of artifact you see where supports contact the model. 


Monday, January 24, 2022

3d printing nerd gifts (1) - wattle and daub fencing

 I was chatting with Doug (dots of paint) after unveiling my 3d printed tacam tank destroyer and mentioned i could easily make some stuff if he wanted. After the initial impressive laundry list he trimmed it down. Wattle & Daub fences was one of them. I thought a post might be worthwhile because there was some interest in my tank, and I realize it's a bit of a black art until you dive head first into the huge pool of data/websites/youtube videos/etc when you finally try and make your own printer work. 

First stop was "thingiverse" which is a website full of free offerings (.stl is the file format you are generally looking for). Sure enough I found a likely candidate, downloaded it, and fired it up in the slicer. 


The STL files are simply (or really complicatedly) 3 dimensional objects. 3d printers are, inherently, pretty dumb pieces of equipment.....they just want to know where to move and when to blob out some material (or for resin printers, when to shine the light and for how long before lifting the plate). Slicers are the translation program from stl to printing instructions. Most of the gruesome optimization work with printers is getting the 'right' settings in the slicer program that give good performance in real life. In my case it's done currently working (it always stops eventually...usually for mysterious reasons).

Inside Cura you can see the yellow image of the fence, there is a square grid showing my 'printing plate'. You have options to change the orienation of the piece, resize it, and uhhhhh....mostly that's it. Besides the hundreds of settings that affect actual printing stuff. This particular piece looked like it wouldn't need any extra supports to avoid collapsing/lifting/falling so I was able to print 'as is'. 

The line on the left is a priming line. It's optional but it makes sure the filament is running properly. I usually note that there's a good inch or two at the beginning that is meh which is why I leave this option on. 

The printer is currently printing the 'brim' which is about 5-7mm of extra material on the base/first level. It assists with making sure the piece doesn't start to lift or move during printing.


 Print complete. Uhhh.......seems a bit low to me.


In comparison to  a similar fence from GW. I'll boost it up to match. Within cura I set the 'Z' axis to match the measure height. I could do it by % increase instead but in this case I'm targeting a specific height rather than a ratio (as you might when changing scales).


Next test print looks much better. You can see the difference between the height of the first (on the right) and the second. I now dump a few copies on the build plate in Cura and set up for a multi print. Each section takes somewhere between 2 and 3 hours.


A close up of the final product you can see it's hard to notice 'print lines'. The horizontal levels that show every time the printer lifts and starts printing. Certainly on flat faces it's more noticeable. At the top posts you see a bit of stringy flash (for wont of a better word). Stringing is a undesirable thing that is hard to get rid of. When the printing head stops squirting out goop (stops extruding) there can still be some pressure in the system and a little extra oozes. This is a familiar effect to hobbyists wielding testors airplane glue. 

The strings are usually seen between isolated structures that require stop/go printing. Such as these posts. I have spent a lot of time trying to eliminate stringing. I have given up. 


The final picture shows the miniature (50%) fences. Doug wanted some to try using for buildings as exposed wattle in damaged areas (I think). They are pretty small, so hopefully they fit the bill. 

I've packaged and sent the post on Thursday, so I imagine it'll show up sometime this week.

Wednesday, January 5, 2022

Romanian Tacam R-2: prequel and sequel

 While hunting for pictures for my new year "resolution" post I ran into some pics of the original print. It's kinda fun to see what is going on with this project. 

 The printer lays down layers sequentially to build up the objects, and due to the analog nature of FDM printers (i.e. it has pulleys and squirts out bits of goop from a print head) there will always be some print artifact. The 'layer lines' are usually the worst culprint. FDM also totally sucks at 'overhangs' as the plastic needs plastic or something firm underneath to prevent it from drooping as it cools (this is all sounding increasingly phallic). 

I decided with the front as the 'top'. I also needed to through a bunch of cylindrical supports to prevent the inside from looking like gravy and to help stabilize the whole thing (prints can be rocked off by the movement of the print head. 

I was actually very pleased with the quality of this print. I've had much worse to be honest. The supports all came off very cleanly and easily as well and the model didn't need much clean up.


Tuesday, December 14, 2021

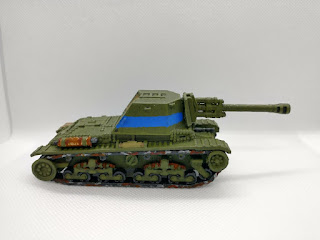
Romanian Tacam R2 Tank Destroyer - 28mm 3d print

 I'm recently been chipping away at a variety of figs and this one is close enough for photos! 


I have been possessed to paint up a 28mm Romanian WW2 force. It seems like a perennial scale/period that comes back again and again (with different rules. Many years ago I read a book: '3 axis, 4th ally' which was an interesting look at the Romanians. Conveniently, for wargaming, they swapped sides late in the war and started attacking the Hungarians (who they really didn't like) and helped push on Germany. This means I have a bigger scope of opponents I can fight 'historically'.