
Most of this post is pictures with little of my usual long winded commentary. Strangely I omitted taking pictures of the StuG, but perhaps I figured it's just more of the same. Enjoy.

Most of this post is pictures with little of my usual long winded commentary. Strangely I omitted taking pictures of the StuG, but perhaps I figured it's just more of the same. Enjoy.


Our slicer, conveniently, shows in red where the overhangs are. This is based on a setting you tell it where your own printer/settings start to fail. For me it's about 60degrees. Note also that if you printed this without supports it'd fallover almost immediately and be a spaghetti mess in no time. You need a decent amount of contact with the build plate.
Once again, I'm using a 1:100 model which requires me to remember to upsize it, and what percent to use.

The blue is the support. It quite clearly illustrates how a throwaway structure is generated which will rise up to support the part of the model which are more than 60degrees off of vertical (such as the bump closest to us there is a pillar)

More photos without commentary to follow. Note the final picture gives you a sense of the type of artifact you see where supports contact the model.


First stop was "thingiverse" which is a website full of free offerings (.stl is the file format you are generally looking for). Sure enough I found a likely candidate, downloaded it, and fired it up in the slicer.
The STL files are simply (or really complicatedly) 3 dimensional objects. 3d printers are, inherently, pretty dumb pieces of equipment.....they just want to know where to move and when to blob out some material (or for resin printers, when to shine the light and for how long before lifting the plate). Slicers are the translation program from stl to printing instructions. Most of the gruesome optimization work with printers is getting the 'right' settings in the slicer program that give good performance in real life. In my case it's done currently working (it always stops eventually...usually for mysterious reasons).

Inside Cura you can see the yellow image of the fence, there is a square grid showing my 'printing plate'. You have options to change the orienation of the piece, resize it, and uhhhhh....mostly that's it. Besides the hundreds of settings that affect actual printing stuff. This particular piece looked like it wouldn't need any extra supports to avoid collapsing/lifting/falling so I was able to print 'as is'.
The line on the left is a priming line. It's optional but it makes sure the filament is running properly. I usually note that there's a good inch or two at the beginning that is meh which is why I leave this option on.
The printer is currently printing the 'brim' which is about 5-7mm of extra material on the base/first level. It assists with making sure the piece doesn't start to lift or move during printing.

Print complete. Uhhh.......seems a bit low to me.

In comparison to a similar fence from GW. I'll boost it up to match. Within cura I set the 'Z' axis to match the measure height. I could do it by % increase instead but in this case I'm targeting a specific height rather than a ratio (as you might when changing scales).

Next test print looks much better. You can see the difference between the height of the first (on the right) and the second. I now dump a few copies on the build plate in Cura and set up for a multi print. Each section takes somewhere between 2 and 3 hours.


A close up of the final product you can see it's hard to notice 'print lines'. The horizontal levels that show every time the printer lifts and starts printing. Certainly on flat faces it's more noticeable. At the top posts you see a bit of stringy flash (for wont of a better word). Stringing is a undesirable thing that is hard to get rid of. When the printing head stops squirting out goop (stops extruding) there can still be some pressure in the system and a little extra oozes. This is a familiar effect to hobbyists wielding testors airplane glue.
The strings are usually seen between isolated structures that require stop/go printing. Such as these posts. I have spent a lot of time trying to eliminate stringing. I have given up.
The final picture shows the miniature (50%) fences. Doug wanted some to try using for buildings as exposed wattle in damaged areas (I think). They are pretty small, so hopefully they fit the bill.
I've packaged and sent the post on Thursday, so I imagine it'll show up sometime this week.

Anyway, I wanted to have a bunch of cars to use as scenery on urban boards. I was inspired by another blogger......maybe Cheet0r? Marx future cars took a while to source off of ebay. Zombie smith makes some very reasonably priced resin cars (I spent an age and a half waiting for delivery due to them moving and the molds needing to be rebuilt).


I can't remember in the slightest what the hold up on the marx car was. I was contemplating trying to put in windows......definitely a bit of a nightmare to do. I incidentally noticed the headlights hadn't been done as I was setting up for the photo, so zipped off to put in a touch of paint. Maybe that was the road block? Sometimes the smallest things can throw sand in the gears of productivity......
In the storage container I found the following which have not even been primed: 2 more marx, 4 more zombiesmith cars, 2 black cat taxis, 2 microart studio buses. I'm dubious any will see the light of 2022 due to the priority on the trays of shame.


The last of the trays of shame photos.I'm sure there is probably more stuff hiding somewhere.....but this is, for sure, the vast majority of it. (he says, thinking of some other stuff already. DOH.).

Some elite chassuer a cheval. French horse artillery x3. A ambul (Knightmare minis perhaps?).


GW Lord of the rings/Hobbit Goblintown goblins. Great as generic muties. Mostly just finishing off the skin which the the heavy lift. Simply side tracked by other projects.

Warlord British naps 28mm. Also some front rank metal as command stands. Also some of the british are actually hanoverian. Started these on a summer trip to a cabin. It's been a lower priority than other stuff.

15mm GZG oceanic union troops in the foreground. A heap of 28mm perry austrians in the back. They were meant to be done for 2020 enfilade which was cancelled for covid when it was early days.
Some townsfolk and vampires lurk in there. I'm stuck on the palette to create some similarity but still be different. Plus with vampires.......silver metal seems trite, but what gold is too....sunny?

15mm rebel minis insurgents. Mostly hung up no the colour of their gear. I wasn't SUPER happy with the secondary colours I got. I just need to bite the bullet and do them.
Solar panel from dreampod9 (heavy gear). Hung up on the colour of the bases.

Shaltari from dropzone commander. Meant to proxie as XCOM robots. I decided to get more and do 6 in white, and 6 in red (basic vs advanced). Just didn't really get restarted (although in Dec I finished the guys in white, 2 of whom were unpainted as they were originally intended to be the red ones).
Bugs are from SIGMA EVENT kickstarted which had some pretty sweat 15mm bugs. To be honest they are a pain in the butt to assemble, but look pretty awesome. I got hung up on them looking too yellow/tan. I wanted a secondary colour for their talons (which, damn it, I'd already painted).

15mm old crow lander. Almost done it's sat for YEARS. I didn't know what to do with the exhaust ports. I wanted hot metal, glowing ports, etc. A bit beyond my ken.
The blue car is a zombie smith car. Not sure what do do with the canopy. December say the yellow stripes added to the back. A definite step up from the plain blue that it's sat around in......FOR YEARS.
Damn there is a lot of stuff to do. And of course this isn't considering the 'ought to' projects at all (like my cowboys). Onward to shame!

These are some awesome alternate Blood bowl sculpts. I can't remember the producer right now. It's a japanese theme of goblins (oni as trolls, ninja and various masked fighters). Some contrast paint use. I got stalled waiting for a bit to come which had been missing in the first shipment (I also primed the second stuff incorrect as seen on the top right).

Reaper (metal) ghosts and banshee. Contrast paints looking good! Really probably just need to do the eyes, and possible some clothes in a differing colour.

Scatter terrain galore! 15mm largely. GZG I think. Some ramshackle stuff for 28mm. Also some HO train terrain in the bottom left which is a bit of a pain to pick out all the stuff from the rust coloured primer. Just a grunt which made me drop it.

Brigade aeronefs. Part of a kickstarter for imperial skies. I have the french painted. Lost my gas on the Brits. The are probably acutally pretty close, but doing light colours over black primer and finely lined decks is a hassle.
Renedra cots and fire pits.
Micro art studios triplex advertisement things for Infinity. I'm stuck on whether to put them on the raised based or not. Its funny what simply things can make you screech to a halt.


CONGO forest tribes. Models from foundry. Got a great deal off tmp. I have the zanibari slavers painted. I though the mostly skin guys would be an easy project. Boredom vs ooooo shiney syndrome. Hard to remember.

Game Craft miniatures. I've had this way too long (ambush alley days). Wanted some colour other than neutral tones.......pink might be too bold. I was thinking of doing some free hand curlycues around the windows, doors and roof lines. Hung up on actually doing it and the question of should I weather it (and how to weather pink).
A continued dive into my collection of stuff. But more importantly....stuff I ought to be painting and finishing off or it will get more dusty.

Mostly undead. We also have some chainmail dwarves and GW dwarves (as a mordheim warband). A few other random things in there including a GW centaur (ugly sculpt I got in a give away box from a friend).

The rest of the GW garden of Morr plus a random plinth with no statue. I got hung up on questions of basing or not (the walls are pretty tippy). I'm close to inking so this could.....could.....go quickly.


These guys have been painted for a LONG TIME. I spent time trying to build up the red so it was gradual and didn't need more highlighting. Fail.
At this point I need to highlight and then start doing the gubbins. There's a few at the back who are mostly done. White and gold (plus some black) are the secondary colours. I suspect I need something else too.

An awesome BT dropship. The scale is all wrong but it was intended for 15mm anyway. Problem is.....colour. I dont' want all grey. But ummmm. not sure what to do right now. Or like, for the very many years before now.

Cheap lightweight foam casts. Part of a big order from.......microart studios maybe? They are primed in coloured primer. Just need to ink them and highlight. The trick, of course, is I might have trouble getting the right colour.
And weathering and serial numbers and stuff. These ought to be easy. Maybe a pallette cleanser at some point.
Generally speaking I favour painting what you are feeling. It's a heck of a lot easier to make progress with painting joy rather than a slog or simply staring at your colours hemming and hawing (or having to repaint things! Arg!).
I hope to be publicly shamed if I don't actually make progress on some of this stuff this year. Better, I hope to have some awesome before and after pics of what I've actually done.
It's always fun to see what you can spot in the background of peoples photos....in this case, the fun stuff should be in the actual focus of the photos.

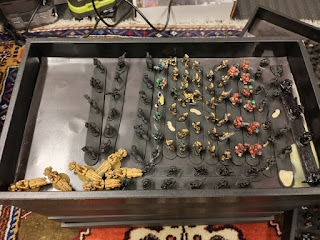
First up, the true 'trays'. 15mm kickstarter ghosts of hefei fabricants and investigators. Infinity computer consoles. GW garden of morr statue. Fenris models fish fountain. GZG androids and field gun. 15mm uk adventurers (I think this is the second set I have, the first actually being painted).
Ion age retained knights. GZG grav cycles with head swaps for retained knights. 'Prang' as orc nob proxies. Some manufacturer I forget the name of on the right. I got a drop ship from them and ended up with some bonus figs in the kickstarter. (Surprise....unpainted).


Microart studios shanty huts. Hoping to use with cowboys I wanted aged wood. The test inking didn't work so well......so I got stymied and stopped for the time being.

GW orces. chainmail orc shaman & sergeant. Ramshackle dungers. bones pathfinder goblins. A rare instance of using contrast paints. This is meant to be for frostgrave and/or general fantasy.

The printer lays down layers sequentially to build up the objects, and due to the analog nature of FDM printers (i.e. it has pulleys and squirts out bits of goop from a print head) there will always be some print artifact. The 'layer lines' are usually the worst culprint. FDM also totally sucks at 'overhangs' as the plastic needs plastic or something firm underneath to prevent it from drooping as it cools (this is all sounding increasingly phallic).

I was actually very pleased with the quality of this print. I've had much worse to be honest. The supports all came off very cleanly and easily as well and the model didn't need much clean up.


