Showing posts with label AAR. Show all posts

Wednesday, November 4, 2026

Congo: The treasure of Makoko Mbe (game 3)

I was going to write up our second game, but it was simply a reversed players version of the 1st game. Not that new or exciting. Instead this is our 3rd game (2nd mission type). We played this the next day and another nerd came down island to join us. Rob/Codsticker took up the mantle of the opposing forces, with Doug kibbitzing and offering advice. 


 The mission this time is to get to treasure buried in the centre of the map. Inconveniently, the opposing forces are racing you AND there are fanatical warrior guardians protecting the treasure. Which is buried/hidden. Both sides march on from different corners and need to get to the centre mound, and spend some time trying to dig up the treasure. There is a time limit. VP's are awarded for defeating enemy units, getting the treasure, and (I think) escaping with the treasure. Everyone is in the deep jungle so they need to find some clue tokens which will tell them where they need to exit the table. It's a lot to do in a short period of time.  


This time the sultanate of Zanzibar slavers (boo hiss) are facing off against the white mans expedition (partially painted....boo hiss). Having learned my lesson the day before I tried for a mix of larger worse units, and smaller elite units (high-low mix I believe they call it when applied to jets). Unlike the previous mission where there was action almost immediately, there was a lot of movement initially. 


 Moving into terrain requires a roll on a hazard table unless there is already a FRIENDLY unit in there, or unless you have scouts. I think we were both pretty scared of the table....and rightly so, there's some situations where nasty predators drop onto the table to give you grief. This probably slowed us down a bit though. 


The 'fanatical guardians' also sounded a bit fierce so we tried to shoot them off the table, and we were both trying to get the other side to do our dirty work for us. Weaken the guardians so we could swoop in and poach the treasure. Needless to say when given an opportunity to fire at the enemy vs the neutral guardians we opted for the former. 


Once again it was interesting to see how the elite units could seriously dish out the hurt, but were glass cannons. The white man's expedition has some crack troops with ranged weapons, but they are only 3 and 4 models...so a single loss is notable. Then you ruminate about the value of using an activation on a reduced unit. The action economy is one of the main decisions in this game. 


 Once the guardians were worn down we started to charge in. Unusually, if you didn't destroy them you'd be thrown back (normally the victor drives the loser off); fanatical indeed. My trained zanzibaris, with a leader, try going in again while their flank is held with covering fire from the slightly larger unit to their left flank. The sikh soldiers in the background are coming off a bit worse for wear. 


It's not all roses for the zanzibaris though. The trained askaris of the expedition close aggressively with their enemies and had some incredible luck, managing to vaporize them. I set up a photo to remind me as they bayonet the last one standing.  


Blood spatter/dead markers show where the conflict has been most intense. There has been some lulls as the lead elements managed to destroy themselves, and sometime enough activations had been focused on them that the trailing forces still took time to get into combat. 

On the right flank the expedition and slavers had been playing cat and mouse around a cluster of jungles with their larger spear armed units. But now they are driving in on the slavers. Numerous 'stress' tokens (in white) have been accrued which debuff your units. If you get more than 3 or 4 (I forget) then each additional one simply removes a model instead. The spear unit (dark because they are only partially painted) is pretty brittle, but could definitely mess up a unit of, say, 4 figures purely armed with ranged weapon. Ah yes, the one in the bottom middle. This is there the card playing with initiative rank starts getting interesting. There is a 'priority' token that gets handed back and forth when their initiative rank is tied/matches. Player holding it can decide whether to go first and hand over the token, or go second and retain. 

The expedition goes in with a hail mary charge to try and edge out the slavers. Bow armed locals don't fair well against even 2 fanatical warriors and are thrown back. 


'Thank you for your service gentlemen' I cackle as I go in immediately after and destroy the defenders. The treasure is mine.....er....where is it? Start digging you fools!


Alas, darkness falls quickly in the deep jungle. The slavers are unable to locate the treasure, and the increased hubbub of the noctural animals and predators encourages them to leave. 

The turn limit being hit we count up points and discover the slavers have edged out the expedition by a couple of points. There was some big points to be had if they had another turn to find the treasure.  

I think the game was generally well received and Doug suggested that I should keep these minis and rules (I'm trying to thin things out these days). So that's a good sign. Not sure when CONGO will hit the table again, but I imagine that it will at some point. 

Wednesday, October 28, 2026

Congo: The Last Queen of Aksoum (Game 1)

 Back in October I had a weekend of visitors and gaming. I decided to use my captive audience to test out some games I had on the bookshelf but hadn't played yet. 


Studio Tomahawks CONGO was one of these.  They are, largely, a pulpy darkest africa mission based game with small units. 


There are about 10 different missions provided with the base game, which come in the form of 'newspaper' publications. While it's fun and looks good, the oversized loose sheets do irritate me for storage purposes. I do wish they have been included in a condensed format as well. Forces are based on points buying, and there are 4 factions/armies (white man's expedition, sultanate of zanzibar, forest tribes, and african kingdoms). 

This particular mission has one side recently acquiring/excavating/discovering a treasure. The other side is trying to prevent them from leaving the table. A classic breakout scenario. Turn order and player alternation is interesting, each side selects 3 cards (from a total of 9 or so) which will given them 1-3 specific actions (move/no charge, shoot, rally/terrify, move/charge) but also a priority number. So if you really want to go early, you may choose a less optimal card (which accomplishes less). Each player flips one card at a time in 3 rounds, with higher priority going first for that round. After 3 rounds a turn is complete and end of turn stuff happens (reinforcements, some table cleanup, etc). 
 

The treasure had to be carried by a unit with a leader (only 1 per side in our setup) or with an auxillary porter. I spread my porters around so that it wasn't clear with unit was carrying the treasure and everyone largely split up. 

Having never played with had no idea how combat and shooting would pan out, and a technical idea for movement (but not yet any intuition). 


Spear armed units are able to throw their spears at short range. Muskets (med range) caused morale effects, but had to be reloaded. Bows were also med range. Jezzail muskets and modern rifles had long range. 


It quickly became clear that while smaller more elite units (which had larger dice to roll to achieve successes [always on a 4+]) were more reliable they were super brittle. Large units of low competency units were solid in both soaking up hits as well as being able to get good results at times (lots of dice with 50% odds can sometimes swing nicely in your favor).  


My initial build/purchase for the sultanate was a bit too elite and suffered for it. I was quite handily creamed and no invader managed to escape the territory of the defending forest tribe. I don't remember the victory point totals but it was embarrasingly not in my favour. 


 We talked a bit about things we learned and setup for a second game with our commands reversed (Doug taking the sultanate trying for a break out). Those pictures and results will be forth coming in the next post. 


Tuesday, May 23, 2023

Frostgrave AAR: Dark Alchemy mini campaign 3: The spreading flames


 Racing through the burning and collapsing factory the two warbands notice movement down an adjacent wing.....and the glint of arcane treasures. 

The 3rd game in our (mostly) cooperative campaign has the crews on a time limit to get in, grab what they can, and get out before the complex is finally consumed/explodes. 


 Notably, within this wing are some automatons, whose purpose somehow involves flaming nearby objects with arcane heat. 

I loved the artwork from the book, and apparantly someone with real skills did as well because I was able to find an stl of a flame flinger and print out a couple for the game. A pretty basic copper paint job went on them. I'll probably return to it one day and add some additional colour and basing.

 A pictorial essay of the game to follow...


Thursday, May 4, 2023

Frostgrave AAR: Dark Alchemy mini campaign 2: Skeletal Run

 Part two of our Dark Alchemy campaign sees the two warbands working together to escape the Alchemical Factory. It's been established that a fire has started which is driving the warbands, and various wandering monsters, out. This second adventure sees the warbands needing to traverse a wide area infested with undead.....who are strangely on fire. Is this some sort of petrochemical greek fire concoction fueled by magic to burn eternally? I'm sure our wizards would love to know!


Cleverly Garret matched the tower we escaped into last game as the starting location for this one.

 The two wizards cast their appraising eye over the terrain and spy the exit. The greedy nature of wizards in general see our natural antagonism develop as we start trying to sneak the treasures that 'ought' to belong to one another away from them.


 The exit resides between the two statues. Largely this is a pictorial essay with brief notes after this. Enjoy.


Thursday, April 6, 2023

Blood Red Skies AAR: First impressions

The elusive Doug in his element
Back in late February when the powers of darkness were still ascendant (hail to the spring!) Doug came over for a gaming weekend. Friday night we went over to Garrets house for some beer and pretzels gaming and to try out Blood Red Skies, by Warlord Games. In a shameful display of winter hibernation I'm only getting this pictures up to the blog now. Oh well.....

We started with Doug and I getting an orientation game with Garret counseling us.  3 vs 3 planes (Germans vs Americans I believe). The rules are simple enough to make sense within two or three turns. The end of the mission typically comes from loss of nerve/confidence/morale rather than shooting down all the fighters. This is a good thing as lots of games of swoopy planes can DRAGGGGGG. Morale is lost everytime the enemy gets a good line on you and manages to fire on you. The shooting resolution is via fists full of dice and looking for fairly high numbers (I think successes are on a 6). The early war planes have much lower offensive dice pools so it's actually pretty hard to splash your opponent.

The bases are pretty clever with a tilt built into the stem. Nose up is advantage, level is neutral, and down is disadvantage. Pilot skill tells you who moves first, followed by (dis)advantage, and then finally actual airplane max speed. It rarely gets to that point. 
As actions you can choose to gain advantage, maneuver (which tries to force your enemy within a certain range 'down' in advantage), or shoot. You can only shoot someone with less advantage than you. You can only take out a plane that is disadvantaged (I think otherwise it's forced lower still). So you end up with team work to hit the enemy by 'maneurvering' to lower it's advantage rating, and then a wingman to clean him up. I think this is the only mildly jarring aspect of the game to me: it makes sense for your high skill pilots to maneuver the enemy down, and then the lower skill (moving later) pilots to shoot them down. Who knows, maybe this is actually how it happens but it seems a bit odd. In terms of game mechanics though it works very very smoothly. 

Next up we fought a three way melee. Japanese vs British vs Russians. Another nice touch is upon the start of the game you make a skill roll for each pilot which dictates what advantage level they start at. You will notice my green plans in the bottom right are all disadvantaged.....the Red airforce believe in training by doing!

We all elected to hold some planes as 'high cover'. I think this is scenario dependent, but basically they can show up on the board edge within a certain distance of marker on whatever turn. If they don't show up you can move the marker along the edge a certain distance. It's like aerial flankers!

Happily I brought in my high cover, who happened to be the highest skill planes, very early. And very very right behind the British. Garret knows the game; it's best to thin our his planes early.

Clouds are very interesting as when you enter them your advantage goes neutral immediately. So they are a safe harbor for planes in trouble, but neutralize your advantage if you are doing well. 

Coming out of the cloud you have a choice to gain advantage, maneuver or shoot (like normal). This means that planes in advantage are pretty safe from things emerging from the clouds.

 The number of markers are very modest. It's important to mark who has and hasn't gone though. With so many planes, that change advantage, it's pretty easy to lose track of who has gone (we had a few times where we noted a plane we missed.....nothing that would have changed much). 

Firing ranges are fairly short, so despite playing on a 3x3 table with a lot of planes the opportunity for fire wasn't overwhelming (lots of planes aren't legal targets as they are at the same or higher advantage). By far maneuvering and gaining advantage are the most common actions taken.


 Planes have some character to them, with differences in offense/defense and, more notably, special abilities. These abilities give you some cards you can play to do a bit extra. Lose advantage to move extra far. Similarly, the aces (rare as they are) come with a special ability which is much more powerful. One of them could use maneuver AND shoot in a turn. Nasty bit of work that could solo enemies on his/her own (Russians had female pilots anyway).


As the enemy gains numbers on you there is a bit of a snowball effect. But skill is quite important. Since you move and do actions it makes sense to move first, and the first movers can often make their opponents lose the advantage they need to take their shots.

Overall I was quite surprised by how much I enjoyed the game. While I don't know that I'd select it as a primary choice for a game night, it makes for quick games: so on a short night, or while killing time for the main event it seems like a great option.


Monday, March 6, 2023

Frostgrave AAR: Dark alchemy mini campaign game 1 - Alchemical Monstrosity


Local gamer Garret managed to inspire me to complete painting a small warband for frostgrave in a timely fashion. Mainly he did this by texting me videos of him filling in a pie chart showing his own progress. In December we were ready to start playing. We have chosen an introductory campaign, Dark Alchemy, found in the Frostgrave folio.The notable changes are that it's cooperative, there is no downtime phase between games, and it's easier to carry chests. 


Garrets well painted set of (ordered) 3d prints certainly looks the part for a fantasy post apocalypse city. 


His warband is led by a Sigilist mage. My own (on the right) is more of a druidic tradition which seems to map to 'witch' in the game. 1st mission we can bring but 2 helpers with our mage or apprentice. Why wouldn't you bring you wizard? I'm not sure.....maybe story only. Or hard mode.


In the background we can see the other star of the game.......an alchemical monstrosity. The alchemical factory we were exploring collapses and catches on fire. We must move quickly and help each other to escape. In hindsight the monster should have been more like chaos spawn/john carpenters 'the thing'/protoplasm and tentacles. Oh well. 

Friday, January 27, 2023

Dougfest 2022 - Zeitlessheim (pt4) Conclusion

The battle for Zeitlessheim (Bleinheim in disguise) has reached a climax. Across the entire front both sides commands are making morale checks to remain in action. Already numerous 'hold' results have stymied assault plans, and even some 'fallbacks' have complicated matters on both side. 

Part 1, Part 2, Part 3

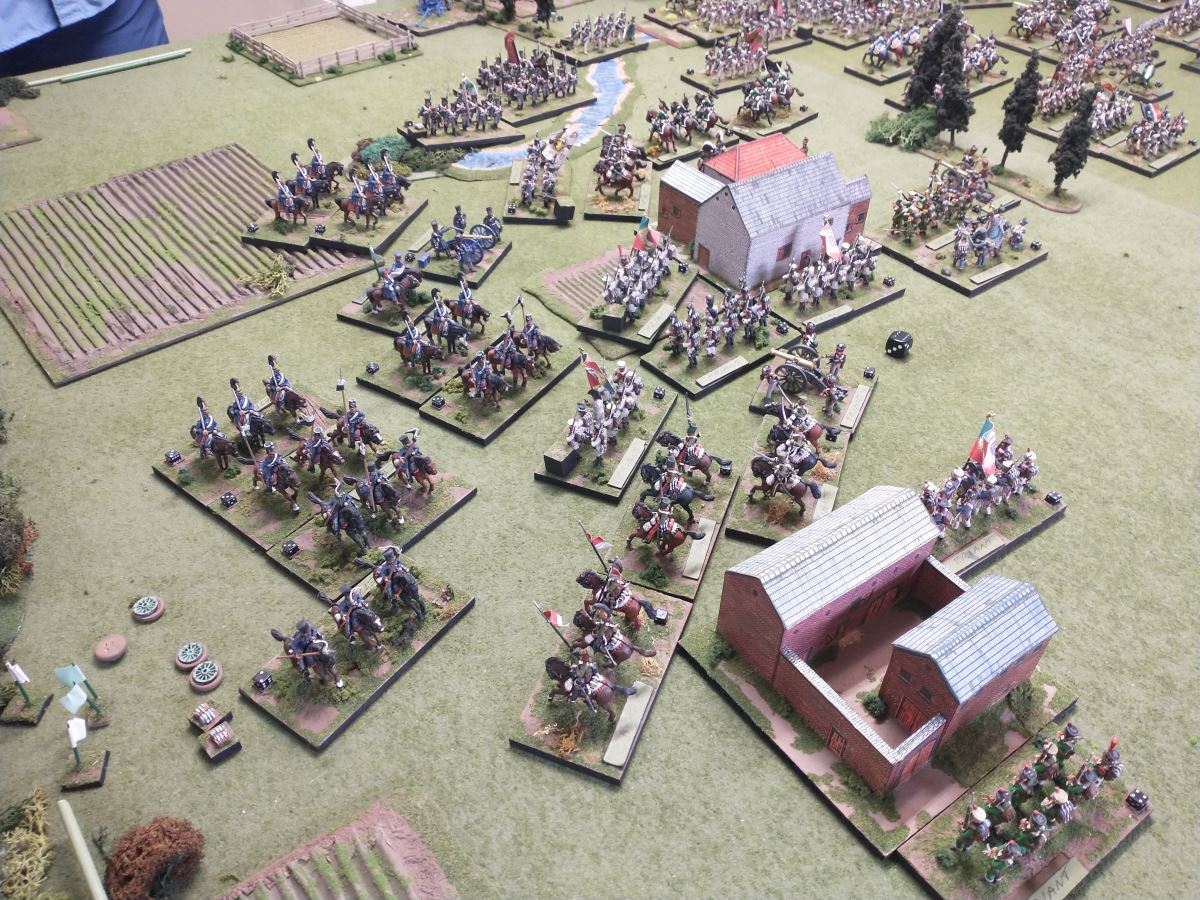
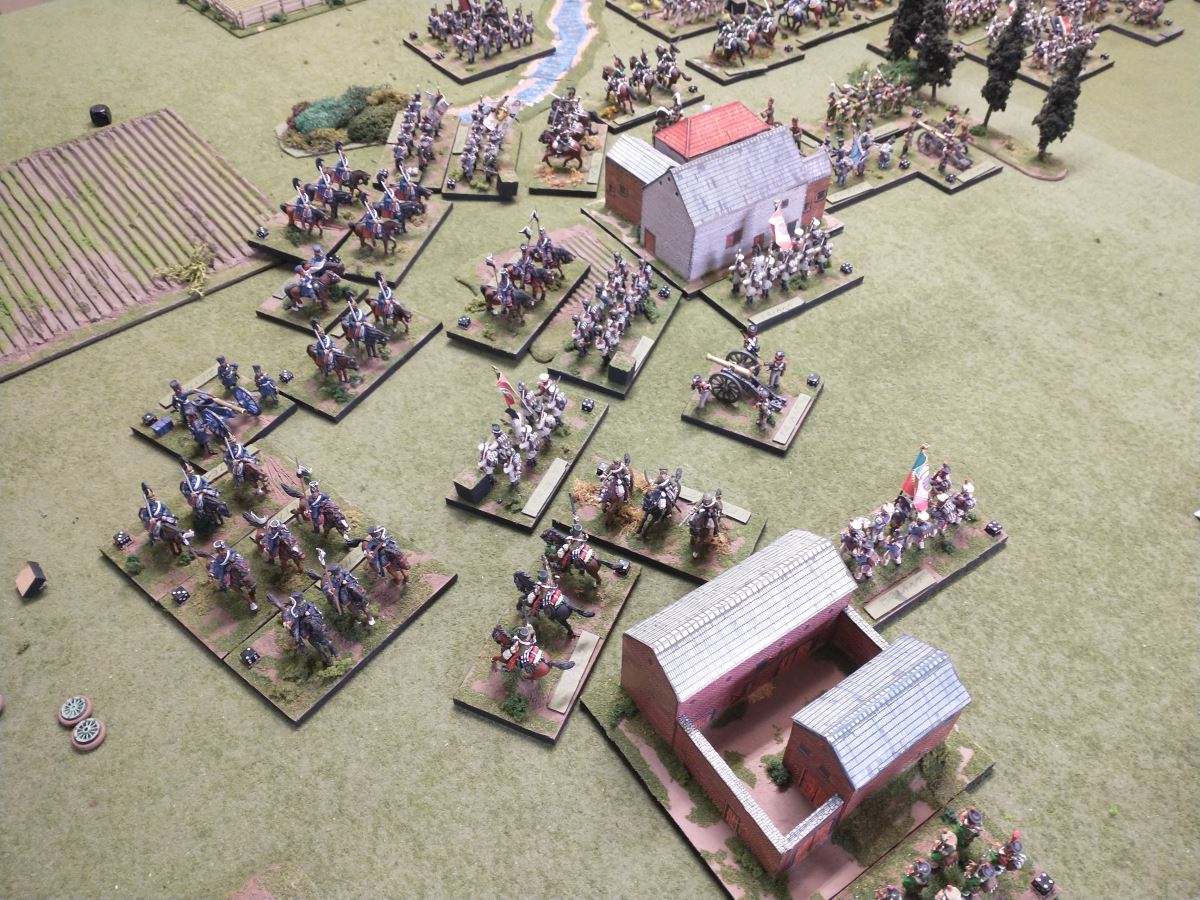
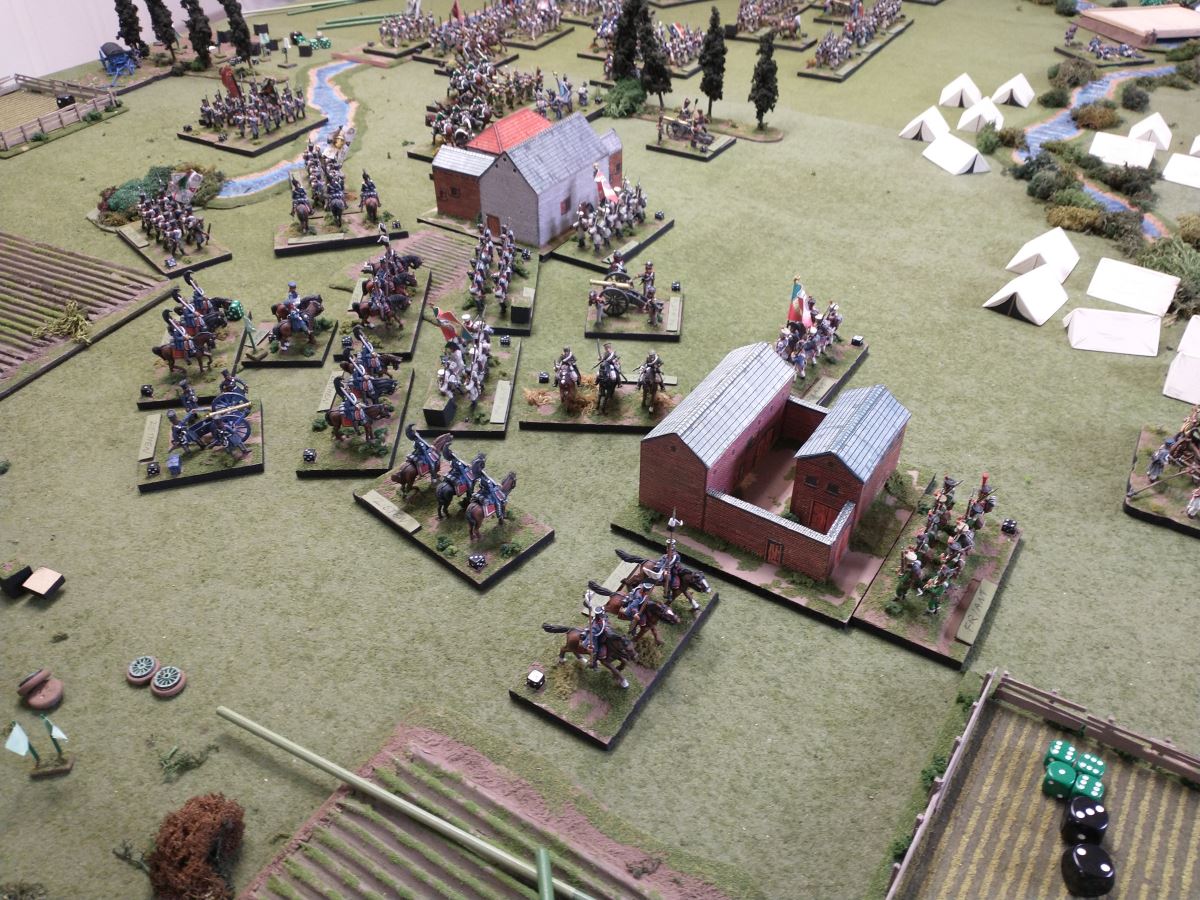
To the Left the Prussians have depleted the Italians who are left covering in the villages and staging a flagging attempt to stop the lancers from seizing their supply line of communication (bottom left near the tents). 

In the centre the French and Italians massive struggle to break the British has been delayed when the British, fortuitously in this case, suffer a withdrawal result and recoil. The extra space relieves the pressure while the British allies attempt to crack the Franco-Italian wings. 

Top Right the Saxons pulled pressure off the British for much of the day as a force in being. Finally their counter attack has pushed the French to the edge....at the cost of the same for the Saxons. With all armies exhausted there's more space for the few effective formations to move about and try and create rational lines. 

Monday, January 9, 2023

Dougfest 2022 - Zeitlessheim (pt3) Struggle for Centre

Yikes, how overdue is this? I'll tell you.....I started the draft in early September. 

How is my recollection? Not good enough. 

 Update: Links to previous battles! part 1, part 2

Centre field (and right flank) we have the French under the command of Seth facing off against the Saxons (upper right corner) and the Brits (centre upper). The Franco-Italian brain trust decided to try and crush the British and force a withdrawal before we were driven from our victory sites (the various towns). 

Seth chose to hold the town on his right flank heavily, which sufficiently deterred the Saxon command that they did very little for most of the game. It later came out that Peter (commander of the Saxons) felt the town fight was a pointless meatgrinder and merely screened it. This would cause challenges for the French to persecute an attack with a strong fresh flanking force hovering menacingly.


Thursday, September 1, 2022

Dougfest 2022 - Zeitlessheim (pt2) Left flank

 On the Franco-Bavarian left flank the Prussians had finally finished eating up the space from the refused flank. Whilst the French were focussing on breaking the British in the centre it would remain a question could the Bavarians hold the line against the Prussians now in firm contact with them.


 Contact was initiated with the lancers duelling it out in front of infantry in square (technically in front because all sides of a square are the front, right? right?!).


Tied combat results are usually highly undesired as both sides lose 2 pips immediately and are locked in place. In our case the units were depleted by artillery fire and vaporized in an orgy of charges and counter charges and horses dragging dead riders off the field.

 Another cavalry unit was dutifully fed into the grinder by the Bavarians, wiggling through the narrow gap between the village and the squared infantry. 

Meanwhile near the creek the Prussians were screening the Bavarian infantry square. This allowed them to advance cavalry to face the thin Bavarian cavalry screen that had the Prussian foot stuck on the banks of the creek. Shortly all hell would break out for the clueless Bavarian commander whose mental focus was elsewhere.

Steady progress by the Prussians depletes another unit of Bavarian cavalry. The Bavarian commander (me!) was starting to feel exceedingly uncomfortable about the risks developing to my line of communications. 

In the centre the British were starting to make morale checks but were passing them with solid die rolls. The Bavarian morale was starting to get a touch brittle so I could no longer recklessly feed troops to delay the Prussians. 

Looking closely at the troops near the stream you can see (I think I missed seeing it at the time) that the Prussians have set up a long cavalry move to 'close the door' (i.e. flank) my defending cavalry. Not that I had much option, no space backward, infantry in square to the front, and infantry across the stream just waiting to advance given the opportunity.


The door closes and, astonishingly, infantry move across the creek and into contact with the depleted cavalry. Another Bavarian unit disappears and now morale checks now have the possibility of the entire command shattering and leaving. 

Furthermore there is nothing between the Prussian cavalry and the line of communication marker (the infantry base to the right of the picture is actually inside the town as a garrison unit....which means it's time consuming and disruptive to redeploy out of the time....and represents a bunch of lost victory points if I depart).


Another quick look at what happened here. 

The line of cavalry screening the towns and batteries. These batteries have been hammering the Brits all game long to assist the French assautl and try and break the centre.


Post door closing. The town is now screened by the very last infantry reserve and a mostly destroyed cavalry unit. Finally the Prussians are in a position to start a town assault if desired.


 On the extreme flank the Prussian lights charge foward towards the LOC (in the ambulance wagon near the tents). There is a single unit of infantry behind the town and a depleted cavalry unit (light against the Prussian heavy) which are available to "stop" the advance. 

The Prussians have superiority in all locations. The Bavarian morale is brittle. The Bavarians still have a mild edge in cannons and the Prussians aren't without some morale stresses of their own. 

The battle is winding down with all formations having the possibility of a catastrophic loss of espirit.


Thursday, August 25, 2022

Dougfest 2022 - Zeitlessheim (pt1)

The main event for Dougfest was a 5 player game. Usually Doug makes us try and puzzle out the battle later but he gave us enough hints to guess on the Friday night: Blenheim. 

Historically the British under the future) Duke of Marlborough  did a fantastically long march across Europe to aid his allies vs the French and Bavarians. Logistics being what they were (weren't really) it was an amazing accomplishment and achieved with no small amount of tactical surprise. 

The Frenco-Bavarians were in camp and caught a bit flat footed by the suddenly reinforced Austro-Prussians who immediately went on the attack inspired by the British under Marlborough.. Picture above we see the Anglo-Austro-Prussians to the 'North' of the picture and the Frenco-Bavarians to the 'South'.

The Bavarians/me will be played by Italians and green clad cavalry (lower left). Seth/French are lower right. Prussians/James (upper left) . Upper Centre are the British/Doug. Upper Right Saxons/Peter. Linear stands of trees help give a clear delineation between commands.

Sunday, August 21, 2022

Dougfest 2022 - General du Corp

The battle was thissssss big
After a long COVID hiatus, Doug hosted another summer game. I had missed Enfilade this year so eagerly headed over for some gaming and socialization with the regulars. General du Corp is a ruleset created by Doug and Seth (and arguably approaching it's final status) for fast play (convention slot) napoleonic large battle play (bases are brigades, and a command is a corp).

As usual, the battle that Doug set up was historically based although not a napoleonic battle it was still horse and musket (he has taken everything from 7 years war to ACW). After finishing the big battle we had time to play so we went over the backup table (set up in case people were interested in a late Friday night game....which we weren't as most of us had done a long commute that day) and played out a fun little battle. 

Taken from the ACW the forces are wildly uneven (I've forgotten the battle but I'm sure Doug will comment below to enlighten us). Peter threw the low die, so he took command of the defenders, seriously hamstrung by having a single commander so would definitely be pip starved for movement. Luckily this was a fun times game and can be gauged in terms of how the historical fight went. 


The defenders (British/Rebels) are holding a series of defensible hills vs the dug in attackers (French/union). Apparently the centre troops took local initiative to test the Rebel lines and, finding them insufficient and under fire, continued to storm forward to drive them off.

I'm unclear if  the flanks were late arrivals or part of the probe in force operation. In game terms we had 3 commands (left/right/centre) with numerical and artillery superiority. Cake walk, right?