Thursday, September 1, 2022

Dougfest 2022 - Zeitlessheim (pt2) Left flank

 On the Franco-Bavarian left flank the Prussians had finally finished eating up the space from the refused flank. Whilst the French were focussing on breaking the British in the centre it would remain a question could the Bavarians hold the line against the Prussians now in firm contact with them.


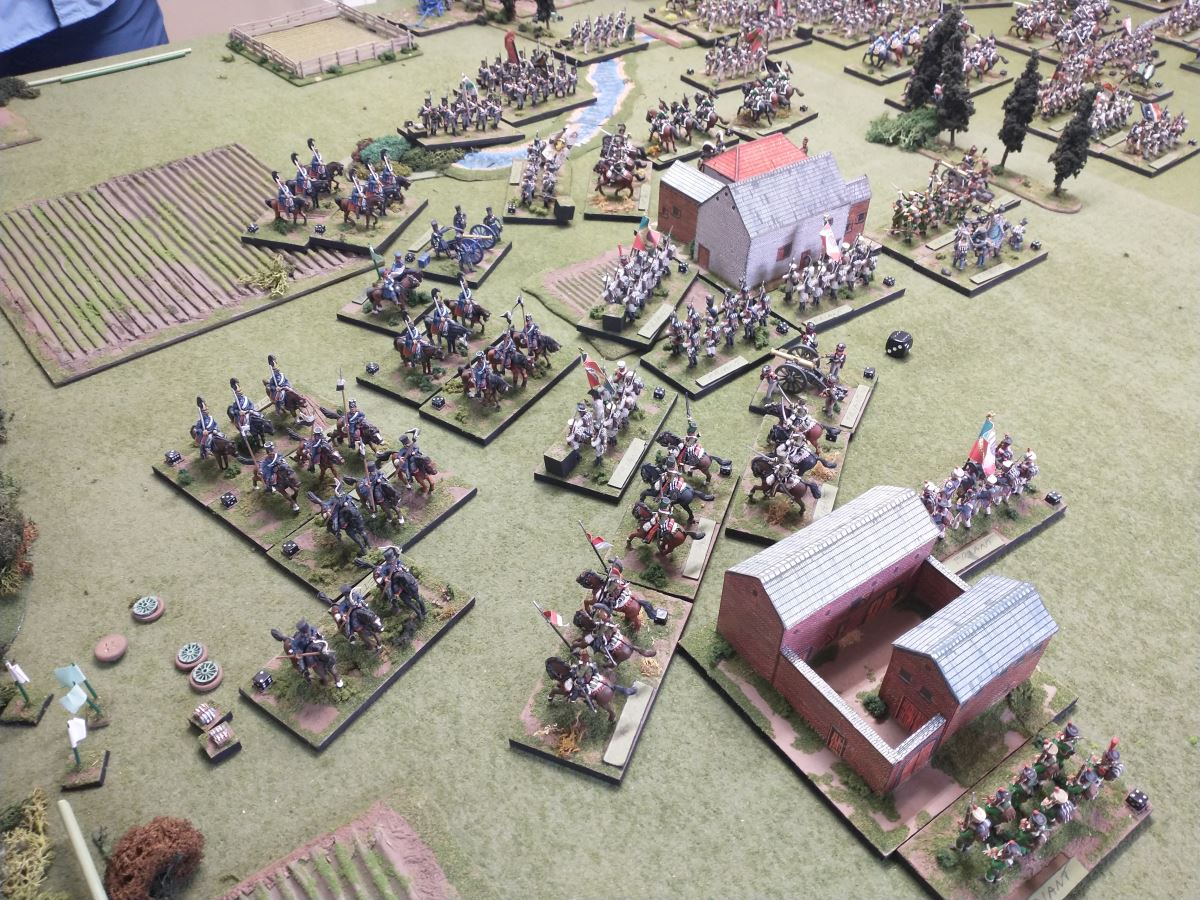
 Contact was initiated with the lancers duelling it out in front of infantry in square (technically in front because all sides of a square are the front, right? right?!).


Tied combat results are usually highly undesired as both sides lose 2 pips immediately and are locked in place. In our case the units were depleted by artillery fire and vaporized in an orgy of charges and counter charges and horses dragging dead riders off the field.

 Another cavalry unit was dutifully fed into the grinder by the Bavarians, wiggling through the narrow gap between the village and the squared infantry. 

Meanwhile near the creek the Prussians were screening the Bavarian infantry square. This allowed them to advance cavalry to face the thin Bavarian cavalry screen that had the Prussian foot stuck on the banks of the creek. Shortly all hell would break out for the clueless Bavarian commander whose mental focus was elsewhere.

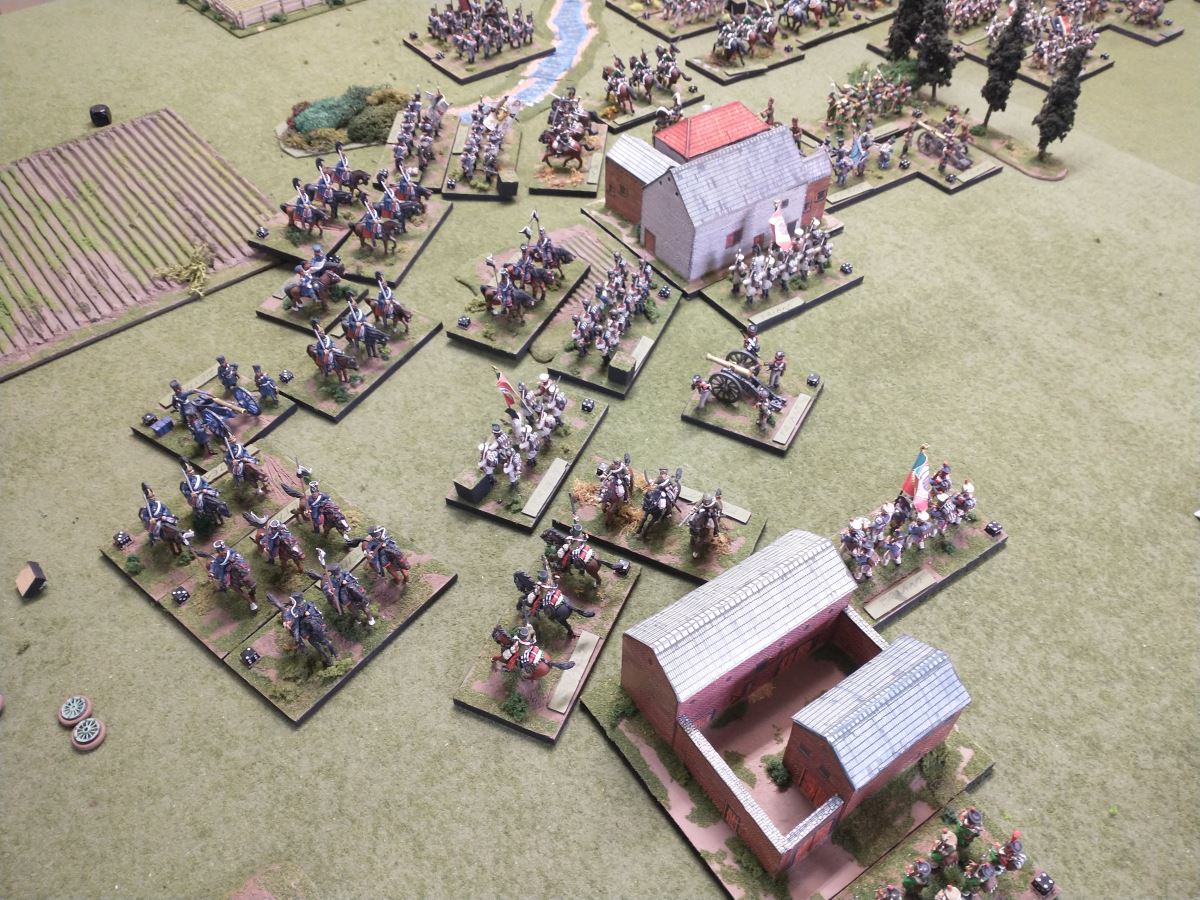
Steady progress by the Prussians depletes another unit of Bavarian cavalry. The Bavarian commander (me!) was starting to feel exceedingly uncomfortable about the risks developing to my line of communications. 

In the centre the British were starting to make morale checks but were passing them with solid die rolls. The Bavarian morale was starting to get a touch brittle so I could no longer recklessly feed troops to delay the Prussians. 

Looking closely at the troops near the stream you can see (I think I missed seeing it at the time) that the Prussians have set up a long cavalry move to 'close the door' (i.e. flank) my defending cavalry. Not that I had much option, no space backward, infantry in square to the front, and infantry across the stream just waiting to advance given the opportunity.


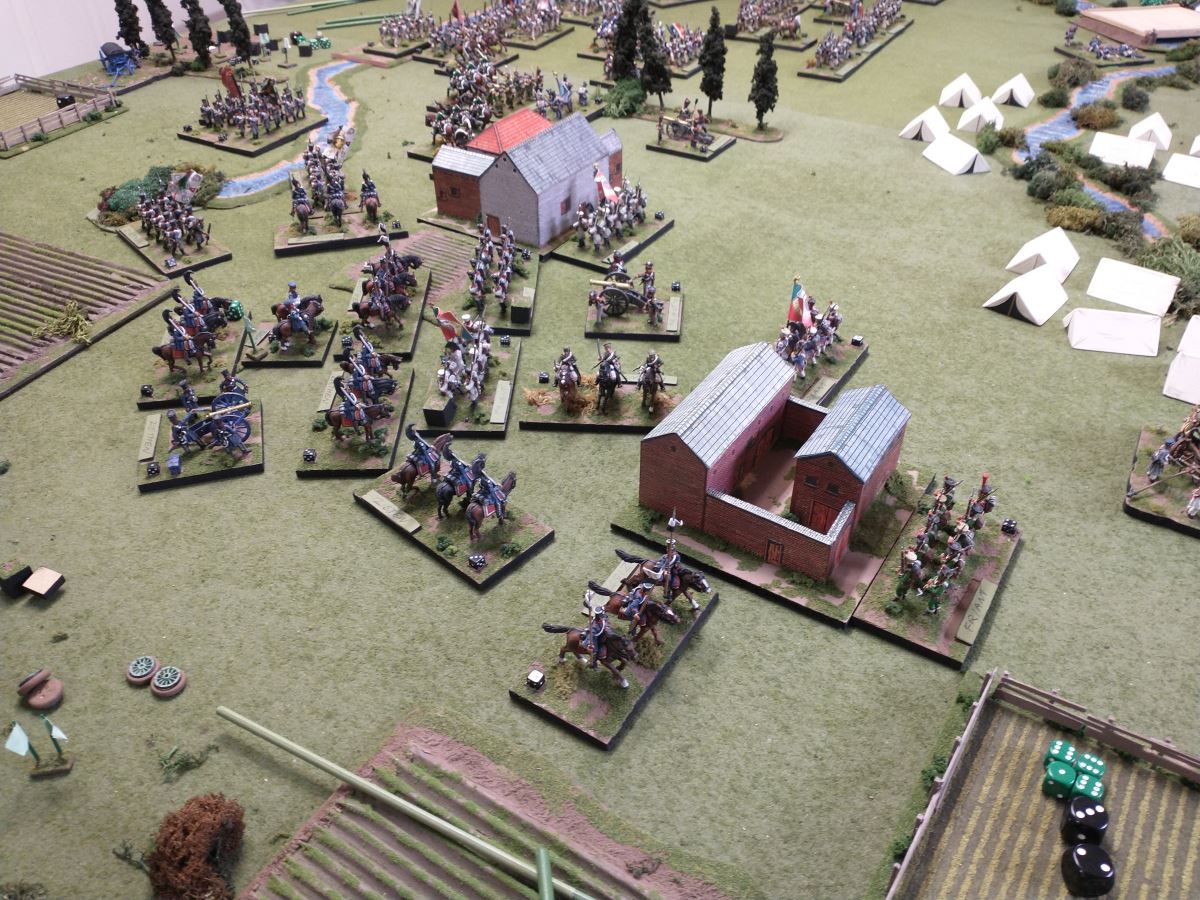
The door closes and, astonishingly, infantry move across the creek and into contact with the depleted cavalry. Another Bavarian unit disappears and now morale checks now have the possibility of the entire command shattering and leaving. 

Furthermore there is nothing between the Prussian cavalry and the line of communication marker (the infantry base to the right of the picture is actually inside the town as a garrison unit....which means it's time consuming and disruptive to redeploy out of the time....and represents a bunch of lost victory points if I depart).


Another quick look at what happened here. 

The line of cavalry screening the towns and batteries. These batteries have been hammering the Brits all game long to assist the French assautl and try and break the centre.


Post door closing. The town is now screened by the very last infantry reserve and a mostly destroyed cavalry unit. Finally the Prussians are in a position to start a town assault if desired.


 On the extreme flank the Prussian lights charge foward towards the LOC (in the ambulance wagon near the tents). There is a single unit of infantry behind the town and a depleted cavalry unit (light against the Prussian heavy) which are available to "stop" the advance. 

The Prussians have superiority in all locations. The Bavarian morale is brittle. The Bavarians still have a mild edge in cannons and the Prussians aren't without some morale stresses of their own. 

The battle is winding down with all formations having the possibility of a catastrophic loss of espirit.


Thursday, August 25, 2022

Dougfest 2022 - Zeitlessheim (pt1)

The main event for Dougfest was a 5 player game. Usually Doug makes us try and puzzle out the battle later but he gave us enough hints to guess on the Friday night: Blenheim. 

Historically the British under the future) Duke of Marlborough  did a fantastically long march across Europe to aid his allies vs the French and Bavarians. Logistics being what they were (weren't really) it was an amazing accomplishment and achieved with no small amount of tactical surprise. 

The Frenco-Bavarians were in camp and caught a bit flat footed by the suddenly reinforced Austro-Prussians who immediately went on the attack inspired by the British under Marlborough.. Picture above we see the Anglo-Austro-Prussians to the 'North' of the picture and the Frenco-Bavarians to the 'South'.

The Bavarians/me will be played by Italians and green clad cavalry (lower left). Seth/French are lower right. Prussians/James (upper left) . Upper Centre are the British/Doug. Upper Right Saxons/Peter. Linear stands of trees help give a clear delineation between commands.

Sunday, August 21, 2022

Dougfest 2022 - General du Corp

The battle was thissssss big
After a long COVID hiatus, Doug hosted another summer game. I had missed Enfilade this year so eagerly headed over for some gaming and socialization with the regulars. General du Corp is a ruleset created by Doug and Seth (and arguably approaching it's final status) for fast play (convention slot) napoleonic large battle play (bases are brigades, and a command is a corp).

As usual, the battle that Doug set up was historically based although not a napoleonic battle it was still horse and musket (he has taken everything from 7 years war to ACW). After finishing the big battle we had time to play so we went over the backup table (set up in case people were interested in a late Friday night game....which we weren't as most of us had done a long commute that day) and played out a fun little battle. 

Taken from the ACW the forces are wildly uneven (I've forgotten the battle but I'm sure Doug will comment below to enlighten us). Peter threw the low die, so he took command of the defenders, seriously hamstrung by having a single commander so would definitely be pip starved for movement. Luckily this was a fun times game and can be gauged in terms of how the historical fight went. 


The defenders (British/Rebels) are holding a series of defensible hills vs the dug in attackers (French/union). Apparently the centre troops took local initiative to test the Rebel lines and, finding them insufficient and under fire, continued to storm forward to drive them off.

I'm unclear if  the flanks were late arrivals or part of the probe in force operation. In game terms we had 3 commands (left/right/centre) with numerical and artillery superiority. Cake walk, right?


Wednesday, July 20, 2022

Bump: Repair the blog social network

 Stew over at 'A Terrible Loss of Lead and Wealth' blog wrote a funny and thoughtful post on his 5 year blogger-versary. It's about the types of posts that get comments (Look it posts) vs simply lots of hits (Resource posts). 


Lest you think that it's about search engine optimization (*shudder*) it's actually about community. He talks about the boost one gets from comments, and indeed the bloggers that swap comments over years and become a type of friend you probably have never met.


He then encouraged readers to comment, and 'bump' another blog (like his own, but in theory this works in the generic sense). This totally resonated with me as I feel like there are a lot of 'broken links' from blogs gone dark, and people who maybe feel lonely blogging and not realizing there are still clusters of very active friendly blogs happening. I have been pretty bad about not commenting lately so I'm going to pick my heels up a bit. And I'd like to bump Stew's blog. 

It's got painted minis and projects and action reports to look at. And it's active. It just might be your jam....

Wednesday, May 4, 2022

May the 4th be with you... 15mm star wars characters

 Yikes! Time spins by so fast. I've been snowed under with daycare plague brought home by the children and a new (second) job. Productivity in the painting department has definitely suffered. I have been doing a paint night a month with some friends via discord so that is a positive. 

Here are some figures that have been recently completed and most fortuitously....topical to the date!


As noted in the title they are 15mm figs. Some pals from space. The maker is a bit reticent to go out and use labels so I suppose I should respect that as well. 


Bases are from proxie miniatures.


Friday, March 11, 2022

WW2 Romanians Great Escape Games (3) - Rifle Squads

The final wave of Romanians from my initial order. I still intend to add an artillery piece (printed but lacking crew) and maybe, MAYBE, some cavalry. That's really starting to stretch the project a bit far though.

Late war the Romanians coup their leadership and join the Soviets in the drive on the axis. In Bolt action they lose their free artillery piece and gain a free squad (if you have 3) of the cheapest version you have.  So I laid these guys out to have at least 4 squads. 

Standardized to 1 light machine gun, an SMG leader, a panzerfaust, (which would be lost in earlier phases of the war), and a bunch of rifles. As one would expect. The 4th squad I think lacks panzerfaust but has a big old anti tank mine being totted by the guy with bronze balls.

Turns out I can manage a 5th squad of 50% SMG. So either the project got overlarge, I've undersized my squads, or I just have some extra flexibility.  Hopefully I can find an opponent this year and get the traditional 'full painted and lose your first game' game in.


Tuesday, March 1, 2022

WW2 Romanians Great Escape Games (2) - Machine Gun, Flamethrower, SMG squad

I've fallen off the wagon! Too long since my last post. Here are the next wave of the Romanians. Once again they are 28mm metals from Great Escape Games. 


The SMG squad is largely equipped with Russian and German SMGs. There is a pack of figs that I ordered for more flexibility in late war Romanians (more captured gear available!), and is padded out with some of the stock infantry (stolen from full size rifle squads making an appearance soon)


Thursday, February 10, 2022

WW2 Romanians Great Escape Games (1) - platoon assets (hq, sniper, mortar, resita atg)

Finally I'm getting around to posting up some pictures of painted stuff. I finished these right at the beginning of the year but got bogged down with pictures. My dave-cave is in a state of disarray so it's a bit of a hassle to carve out the space needed for pictures. I'm also not SUPER happy with my light box for pictures yet. It might be a backdrop issue, or it might be that it's a bit too small. 

These folks are from Great Escape Games, one of maybe 3 companies that do 28mm metal Romanians for world war 2. I found their range to be the most comprehensive so I ordered up their platoon pack and a bunch of side products so I didn't need to faff about filling in gaps. One and done is how I typically like to order up projects. Hilariously I find myself needing some more crew for guns (as I printed an artillery piece). Oh well, the nature of the game (see what I did there?). 

Please enjoy photos of: a platoon headquarters, sniper team, light mortar team, and antitank gun (a resita 75mm gun, which I think was domestically produced). 


Bases were finished with "Luke's ready mix" something I saw on another blog and wanted to experiment with. Fast, easy, and doesn't look shabby. 


The minis were protected with future floor polish applied with a brush. I figure with metal figs, and a skirmish range it will worthwhile having a hard finish. I should, and probably will eventually, hit it with some matte to get rid of the shine. 


Wednesday, February 2, 2022

3d printing nerd gifts (4) - finished products

Doug works fast. The package arrived 8 days ago and he's already finished his tanks. I hope that he will forgive me in 'stealing' his pictures he sent me for a post. It's nice to have some continuity and see the final product in this series. I can't do better but heavily quote from the email. 


"Before I forget again, thanks for the support removal.  I was quite prepared to do that (had picked up some others in the past so knew what to expect).  it is a pain to do.


The StuG had a barrel replacement as the ink tube was a perfect fit.  I took your advise and coated the Valentine's with runny super-glue with a few coats and it did smooth out a bit. 
 
The miscast boogie wheel on the Valetine is not an issue as you can see I covered the track area with lots (and lots!) of snow - it is a Lend-Lease arriving on the Moscow front just at the end of 1941. This ‘evens-out’ my collection which now can accommodate 3 a side.
 
The StuG is to fight my t34-85 during the summer of 1943 also in Russia for some one-on-one action.   The side armor are plastic pieces which match perfectly with your print - your scaling is perfect!"


I will concur with Doug, removing supports is a bit of a pain. Certainly some are worse than others. Gotta say these look great, as does pretty much everything Doug ends up producing. 
Head over and take a look at his blog Dots of Paint for more.

Sunday, January 30, 2022

3d printing nerd gifts (3) - Tank Bodies

 Part three on my gift post is pretty brief as we've looked at slicers and supports. Now we just see something a bit larger and more complicated printed out. I attempted to place some supports within the track segments so EVERY SINGLE WHEEL wouldn't suck from overhangs. Unfortunately the support didn't work well (too narrow I think....I used a plugin for manually placing rods). This unfortunately meant there was some extra spaghetti around the tanks, but thankfully tank tracks are easy to weather to cover up the crappy printed bits. 


Most of this post is pictures with little of my usual long winded commentary. Strangely I omitted taking pictures of the StuG, but perhaps I figured it's just more of the same. Enjoy.

Ah yes, the 16hour print. I run my print jobs at a slow speed and thin layers to improve quality and avoid knocking them off the build plate. I've sorta had issues so this is a 'once burned, twice shy' thing. 

Thursday, January 27, 2022

3d printing nerd gifts (2) - Valentine Tank Turret

As part of the gift I'm printing for Doug (dots of paint blog) he also requested two tanks. We will look at some of the challenges of more complex shapes in this post. FDM printers sorta suck with undersupprted overhangs.....which is to say printing in midair works poorly. With an angle you can manage a gradual extension out without problems (such as an arched door). Otherwise you get big droopy loops and poor quality or worse. 


Supports, a throwaway structure connected to the ground/build plate which rise up to the unsupported part are the solution. Supports have their own challenge, besides the waste of material and time....they usually leave some cruddy artifacts where they connect. It is therefore key to choose the best orientation to minimize overhangs, or to make them where they aren't going to be seen well. For tanks, and me, that seems to be barrel up.

Our slicer, conveniently, shows in red where the overhangs are. This is based on a setting you tell it where your own printer/settings start to fail. For me it's about 60degrees. Note also that if you printed this without supports it'd fallover almost immediately and be a spaghetti mess in no time. You need a decent amount of contact with the build plate.

 Once again, I'm using a 1:100 model which requires me to remember to upsize it, and what percent to use.

 After slicing you can (and should) preview the print to make sure the computer hasn't chosen to do something wacky. Here we see the original structure in red (technically the walls are red and inside fill is yellow. We aren't looking at a cross section so we don't see the yellow right now). 

The blue is the support. It quite clearly illustrates how a throwaway structure is generated which will rise up to support the part of the model which are more than 60degrees off of vertical (such as the bump closest to us there is a pillar)

 Printed we see things look pretty decent. The barrel is a bit rough. I suspect this is due to flexing of the tall narrow structure so the small play in the material means perfect alignment doesn't happen and the layer lines are a lot more obvious.

More photos without commentary to follow. Note the final picture gives you a sense of the type of artifact you see where supports contact the model. 


Monday, January 24, 2022

3d printing nerd gifts (1) - wattle and daub fencing

 I was chatting with Doug (dots of paint) after unveiling my 3d printed tacam tank destroyer and mentioned i could easily make some stuff if he wanted. After the initial impressive laundry list he trimmed it down. Wattle & Daub fences was one of them. I thought a post might be worthwhile because there was some interest in my tank, and I realize it's a bit of a black art until you dive head first into the huge pool of data/websites/youtube videos/etc when you finally try and make your own printer work. 

First stop was "thingiverse" which is a website full of free offerings (.stl is the file format you are generally looking for). Sure enough I found a likely candidate, downloaded it, and fired it up in the slicer. 


The STL files are simply (or really complicatedly) 3 dimensional objects. 3d printers are, inherently, pretty dumb pieces of equipment.....they just want to know where to move and when to blob out some material (or for resin printers, when to shine the light and for how long before lifting the plate). Slicers are the translation program from stl to printing instructions. Most of the gruesome optimization work with printers is getting the 'right' settings in the slicer program that give good performance in real life. In my case it's done currently working (it always stops eventually...usually for mysterious reasons).

Inside Cura you can see the yellow image of the fence, there is a square grid showing my 'printing plate'. You have options to change the orienation of the piece, resize it, and uhhhhh....mostly that's it. Besides the hundreds of settings that affect actual printing stuff. This particular piece looked like it wouldn't need any extra supports to avoid collapsing/lifting/falling so I was able to print 'as is'. 

The line on the left is a priming line. It's optional but it makes sure the filament is running properly. I usually note that there's a good inch or two at the beginning that is meh which is why I leave this option on. 

The printer is currently printing the 'brim' which is about 5-7mm of extra material on the base/first level. It assists with making sure the piece doesn't start to lift or move during printing.


 Print complete. Uhhh.......seems a bit low to me.


In comparison to  a similar fence from GW. I'll boost it up to match. Within cura I set the 'Z' axis to match the measure height. I could do it by % increase instead but in this case I'm targeting a specific height rather than a ratio (as you might when changing scales).


Next test print looks much better. You can see the difference between the height of the first (on the right) and the second. I now dump a few copies on the build plate in Cura and set up for a multi print. Each section takes somewhere between 2 and 3 hours.


A close up of the final product you can see it's hard to notice 'print lines'. The horizontal levels that show every time the printer lifts and starts printing. Certainly on flat faces it's more noticeable. At the top posts you see a bit of stringy flash (for wont of a better word). Stringing is a undesirable thing that is hard to get rid of. When the printing head stops squirting out goop (stops extruding) there can still be some pressure in the system and a little extra oozes. This is a familiar effect to hobbyists wielding testors airplane glue. 

The strings are usually seen between isolated structures that require stop/go printing. Such as these posts. I have spent a lot of time trying to eliminate stringing. I have given up. 


The final picture shows the miniature (50%) fences. Doug wanted some to try using for buildings as exposed wattle in damaged areas (I think). They are pretty small, so hopefully they fit the bill. 

I've packaged and sent the post on Thursday, so I imagine it'll show up sometime this week.

Friday, January 21, 2022

28mm Vehicles #3: Marx and ZombieSmith (Redemption)

 The last time I had a set of painted cars to present was july....2018. Having lurked in the tray of shame for far too long I have managed to deliver the first items into the tray....OF REDEMPTION! Yes folks, hence forth anything that is escaping from the prison of shame shall graduate into the light of redemption. 


Anyway, I wanted to have a bunch of cars to use as scenery on urban boards. I was inspired by another blogger......maybe Cheet0r? Marx future cars took a while to source off of ebay. Zombie smith makes some very reasonably priced resin cars (I spent an age and a half waiting for delivery due to them moving and the molds needing to be rebuilt).


 The lights are all penned in with a fine tip sharpie before painting. I think this was one of the long standing blocks on this one......it was just a mass of blue otherwise. Also the canopy I didn't know what to do. I briefly tried painting silhouttes of tall buildings and quickly scrubbed that (literally wiping away the attempt) *shudder*.


I can't remember in the slightest what the hold up on the marx car was. I was contemplating trying to put in windows......definitely a bit of a nightmare to do. I incidentally noticed the headlights hadn't been done as I was setting up for the photo, so zipped off to put in a touch of paint. Maybe that was the road block? Sometimes the smallest things can throw sand in the gears of productivity......


In the storage container I found the following which have not even been primed: 2 more marx, 4 more zombiesmith cars, 2 black cat taxis, 2 microart studio buses. I'm dubious any will see the light of 2022 due to the priority on the trays of shame.