Showing posts with label terrain. Show all posts

Tuesday, February 14, 2023

Necromunda weekend (eye candy post)

An eye candy post from a weekend at the tail end of 2022. A friend (Jason) from highschool took the ferry over to visit and game on the weekend. We met up with a third player (Kevin) who has just moved (back) to town. 


My necromunda gang from the 90s hit the table again versus some squats and some meatcarving chaos worshippers. Kevin provided the painted terrain while I unveiled my mass of 3d printed terrain (all in gray and unpainted).

 Jason and Kevin had a quick game while I stat-ed up my gang. Aggressive positioning and sneaky infiltrators locked Kevins Squats in a corner while the flesh blenders that look vaguely human sprinted towards them through tough terrain. It was over fast and messily when the leaders of the Corpse Grinder cult arrived.


I have some of the same terrain (the Pegasus ruined building), and the mechanicus motors and was quite jazzed with how it can all look with a lick of paint. Perhaps I'll get some down this year.


 We then setup a three way engagement. We allowed for clambering over the walls to give some more tactical options. The big grabber could be operated too, although we didn't quite get in position to grab enemies and drop them in horrible locations.

This was harvest scenario where we needed to seize the blue drug plants to make money. Having seen the power of flame weapons in the first game my red cloak cultists ended up fielding as much flame as possible. Cleanse the unbelievers!!

Monday, May 4, 2020

April update - Austrian Cannon

April was another very lacklustre month. I managed to pull my thumb out and finish banging out some cannon at the end of the month.

These are from frontrank and there is a heap of crew to paint up as well (primed only). 4 foot cannon, and 2 horse (with the funny benches).

I possibly ended up using an overly dark ochre colour, but I'm sure campaigning is a grubby business.


I also got around to cutting up a bunch of dowel as measuring sticks for General du Corp. The long sticks are for artillery (how fitting), medium command, small movement. I ended up with a single stick from Doug which is astonishingly smooth compared to my own. I do wonder if thats the wonders of people using/holding/fiddling with them till they smooth, or if I just ended up with crappy wood and paint.


 The last addition to the painted pile is some old GW oil drums. I *didn't* actually paint these myself. I someone managed to convince my buddy Garret to do so. I suppose that's ALMOST like painting it myself (he said lying to himself). Garret did a great job weathering these and used some colours I wouldn't have selected myself. I quite like that aspect and can appreciate why some hobbyists swap painting squads with their buddies.


Sunday, December 29, 2019

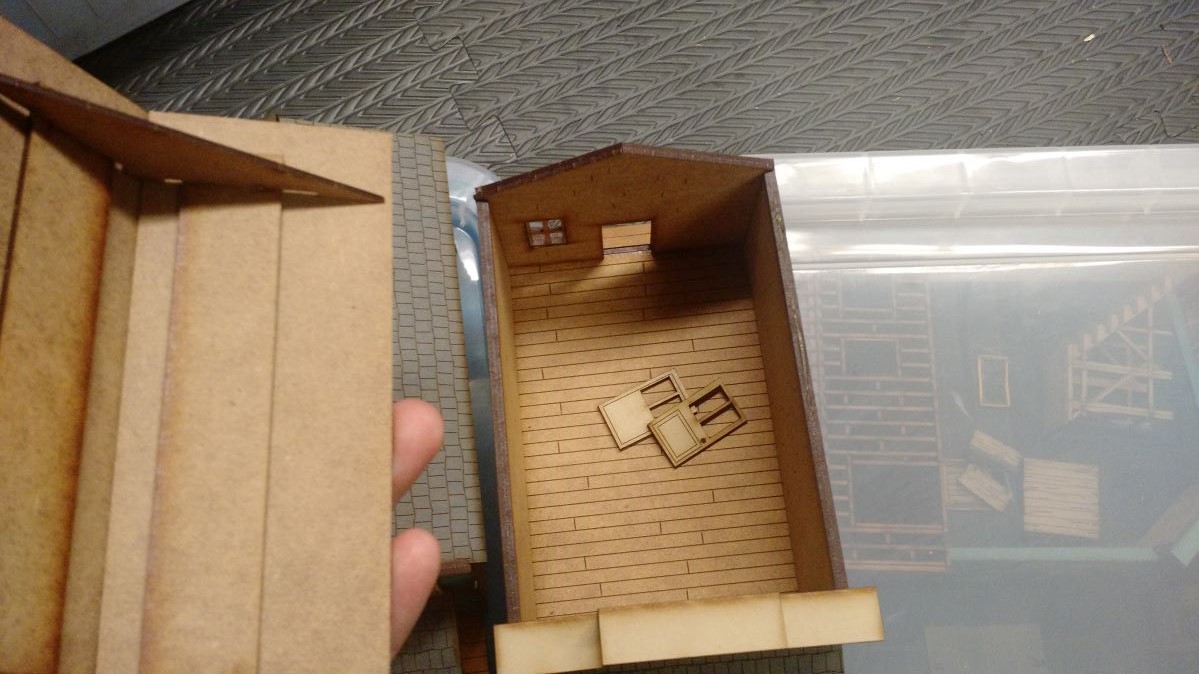
Empires at War Cowboy Buildings - pictoral review


In the quest to find SOMETHING I did this year I remembered I assembled these buildings a bought. Small victories! They come from Empires at War  as a set. The price seemed right and they shipped quickly. The buildings were mostly simple to assemble but there were one or two parts of the instructions that were fairly difficult to parse out......previous experience assembling mdf terrain is an asset.


I haven't bothered to put in the doors for most of the buildings. I think my biggest critique is the orangey tone to the 'wood' on the side. If probably doesn't come through on the internet/these pictures well but it's a bit too orange for my taste. Not a serious problem really, but a niggling minor complaint.


Thursday, March 8, 2018

A roof over your head: Renedra Tents and GameCraft Afghan Homes


Renedra has put out some plastic tents that I see popping up in a lot of photos. I quite liked them and grabbed some for my cowboy town (I reckon before you even get a stick frame up, you're going to be tenting it). Truly tents have a lot of use in terms of age and setting. I'll probably grab the round ones at some point too.


These buildings were from a rather large order I made in 2012. I think I was inspired by ambush alley and wanted a great table to play on. 6 years later I've painted 3 of them. Booo. I struggled for a long time trying to decide how to 'rough them up' and make them look stoney/plaster covered/whatever.

These two guys were painted with the same craft paint colour and washed with two different ink mixes. I *think* I like the more yellow one, but I suspect it's more because I spread the ink better and ended up with less of that crappy rinse streak effect at the bottom. Variety is important in a table that will host these things, so either way it's a bit of a success.


Sunday, November 26, 2017

Undocumented work: Jungles

I was swapping emails with a local gamer and tried to send him pictures of some of the terrain I'd made. Turns out I'd never put pictures on my blog. Even more surprisingly, I didn't have pictures. Ver strange because I could swear I took a photo when I finished the project. Strange stuff.

These are jungle terrain bases on CDs. I got the idea from Too Fat Lardies walkthrough for "charlie don't surf". It took me a coon's age to track down the dark green 'grassy' door mat stuff. Months and an international border before I spotted one in point roberts. Pain in the posterior to stuff in my backpack and motorbike with it. Even more annoying that now I see them regularly in many hardware stores. I must have been ahead of my time.

The original pictures appear to be casualties of the photobucket shakedown that has screwed a lot of blogs recently. Basically you use cake topper palm trees, various aquarium plants, doormat grass, hot glue gun, and (for me) pumice gel media.

I find the palm trees too cartoony and too short. I'd like to make some extra bases with taller palms to make a 'triple canopy' type thing. The cd shinyness also seems to peek through too much. I suspect hitting this stuff with primer before hand might help.....although it might just flake off and leave a worse bond. Though I've noted a bunch of damaged trees that need some fixing (off picture there's probably another 8ish bases) so I probably shouldn't store them at the bottom of a rubber maid container with all the extress build materials on top (dur).


Saturday, September 19, 2015

6MMRPC Week 15: Ainsty Wharves and Jetties....shipping out

The horros of packing up the house and dealing with old employer/new employer HR continues to suck at my time and energy. I haven't gone dark quite yet though. Here is another appropos submission, considering my move will require a ferry ride.

One again we have some more Ainsty resin terrain. All my Ainsty stuff came in two large purchases that occurred in successive Decembers. I remember this because 'it was a gift to me'.....how we trick ourselves. It's great to see the lot finally done up. I still have other Ainsty stuff, but they will be their own projects.

After finishing the browns, I wanted to do more, and add some colour. Scum/Kelp/mold/rot/etc was the obvious choice, but I was quite sure how to swing it. Thankfully I remembered the great work done by Barry at League of Augsberg on his pirate ship (here), who shared his recipe when prompted.

Voila:

Definitely the look I desired.


Monday, September 7, 2015

6MMRPC Week 13: Ainsty baggage....packing up

A fairly meagre offering this week. I finished off my resin furniture from Ainsty and a load of shipping loads.

I'm not entirely pleased with all the material on the shelves, especially as the markings are noticeable inconsistent between 'similar' boxes. Presumably it will be better a couple feet away. Otherwise everything looks just fine enough.

The topic is fairly apropos, as I am moving at the end of the month. I'll be re-locating (via a ferry!) to Nanaimo, BC (located on Vancouver Island/West coast of Canada). Already much of my hobby material has disappeared into boxes, and the hassle of organizing a move and changing jobs is taking a big bite out of time and energy. I suspect I'll drop silent for a number of weeks, but not quite yet.
...

Sunday, August 23, 2015

6MMRPC: Week 11 Vietnam Firebase Fortifications

Having earlier completed my trial artillery fire pit (here) I finished painting up the rest of the hydrocal terrain I cast up using Thomas' molds. The hydrocal (tougher plaster essentially) was allowed to dry fully for about a week, and then painted with future floor polish to aid with robustness/anti chipping. I think this will also help avoid the hydocal/plaster from drinking up paint.


The scale is about 20mm (1/72). I will happily use if for 15mm figs, and I suspect it wouldn't look too far out for 28mm as well (although maybe the artillery pits would fit a heavy weapon rather than a true towed weapon).


 More pics after the jump....


Monday, August 10, 2015

6MMRPC Week 10: Ainsty Furniture

My painting efforts continue to be stymied with weddings and birthdays cropping up in the late summer. I did, however, manage to finish off some bits I've been picking away at for a couple of weeks.

Up this week are tables, kegs, chairs, and part of a store set from Ainsty. Ainsty has some very cool ranges, all in resin, and are located in the UK. Naturally this means fairly steep shipping for those of us in North America (to be honest, it's getting crushing from everywhere to anywhere it seems). 

Sunday, June 28, 2015

6MMRPC Week 4: Bones Aina, plaster rocks, pinning the jabberwock

We are rounding out the first month of the challenge. It's been very impressive seeing the volumes of figures some people have managed to finish weekly. I keep telling myself that 6 months is a long time, and if I can continue to reliably finish at least 2 a week, I'll be making a sizeable dent in the collection. It's a bit of a lie, if I only achieve 52 figs, but I have hopes for some large project completions as well.

This week I finished off Aina, yet another Bones figure. She was in my painting queue in the intersession, but I fell off the painting wagon. I finally finished her, and was quite happy with the result. I was vaguely inspired by recently re-reading Lloyd Alexanders Prydain chronicles, and wanted a 'Eilonwy' type character. She struck me as a fairly strong female character, although I'm not entirely sure my wife would agree.

The free handed shield is not quite symmetrical, and the hair isn't *quite* as red/copper as I'd wish, but otherwise I'm very happy. Unfortunately in a true bones fashion, her sword is bent, and despite being bent back with hot water, I don't think I 'quenched' it well in cold water, so it migrated back to the bent shape. Boo.

Sunday, June 21, 2015

6MMRPC Week 3: Follow the light!

 It's nice to get to bash out some simple terrain pieces from time to time. These light poles were part of a large order I made from Critical mass games a very (very) long time ago. They have since been removed from their catalogue, but I sorta like them.

It took me forever to decide on the colours, do a image search for light poles, and there's really not that much that is interesting/inspiring. I eventually decided to go for the colours of my human sci fi force. Also the poles around here are mostly green if not mounted off of treated wood.

Sunday, February 22, 2015

6MMRPC: Week 25 Stony Head Terrain (Dream Pod 9 Heavy Gear)

A bit of a disappointing week painting wise. I managed to finish my fig for the caffeineforge weekly posting (which I'll reveal Wednesday), but I wasn't super happy with it's appearance. Similarly, these figs were pretty easy to paint up, but I'm just not too jazzed about them. I think part of the challenge is I want them system, size, and location agnostic...which prevents me from doing too many details. I don't want vegetation b/c they may show up in a dessert or badland. Similarly, bird droppings may tighten up the size or terrain biome they would be in. Bah.


Sunday, November 9, 2014

6MMRPC: Week 10 - Five (incomplete) items for your perusal


It's been a strange work week, and illness has been skirmishing with the household. As a result, I've been a remiss in my efforts to actually get paint on some miniatures, although I have been active in other parts of hobby-ing. I managed to cut up and deflash a number of figs. Many are  assembled, and I even partially primed stuff. This is the type of easy thing I tend to work on when I can't summon up the verve to get on with paint.


1 - First up is the Russian 28mm Naps. These are more of the Perry's figs I received shortly before the challenge began. To the left are some lead jaegers. I've decided my plastic jaegers will have the forage cap. To be honest, the russian infantry all looks VERY similar. The jaegers do have a lighter green coat (I may be going too light with this, we'll see), and black harnesses. As opposed to dark green and white harnesses.


2- I managed to clean and prime these "Adder" hovercraft from the ion age. Run by Gavin Syme of 15mm.uk the range has been very cool. I have a fair amount of their stuff. There are some things that haven't really grabbed me, but most have.

I intend on adding this to my NAC force (from GZG) which got some play time with Gruntz (which will mean MORE green painting). I figure these will make some nice fast and small troop transports.


3 - These folks are the freebies I got back in September. The chainmail figs (orc shaman and trooper on the left, and 2 dwarves) are very clean castings. I was very impressed.

Two human 'diggers' from GW's gorkamorka are in the back. I'll paint them as random post apocalypse/necromunda gang type figures. Should be easy.


The mordheim Ogre, as noted by some commentators, is a great characterful model. It would appear he has a victim in his wicker backpack as well. The kislevite female archer/scout I'm less enthralled with. She is FAR too busty. Also her sword arm will probably need to be pinned as it doesn't want to stay attached.

The last fig is a beastman centaur. I like it....sorta. The head is a bit silly with a skull helmet over a fairly diabolic face with a braided goatee and horns. Not a fan. The super dumb part is his weapon. I suppose a club with multiple spikey bits is on par for technology, but the frickin thing is taller than a human. Also, it probably doubles the height of the fig which is rearing and pointing his weapon straight into the air. I'll definitely be making a conversion with this.


4 - This is the modular refiner set from pegasus games. It's been around for a long time, and I finally picked one up probably even within the last year. It's truly tedious to clip out and clean the flash though. I'm hoping it won't be utterly confusion to assemble. I do see numerous picks on the web of these things lurking in the backgrounds as scatter terrain, so I'm hopeful of the final product.


5 - A non-hobby item; The fall forest bounty. I went mushroom picking last weekend with a friend who does it regularly. This was the haul between the two of us for just under three hours. Chanteralls (yellow), hawks wings (top brown/grey), some oysters, and some other stuff I forgot. It was a tasty week to be dining here.


Sunday, September 28, 2014

6MMRPC Week 4: Terrain - Rock spires

A bit of a delay getting out my pictures this week. I had intended on posting my terrain pics Wed, as I had finished off the project already. Full disclosure, these things where mostly done a whole ago and needed the basing complete. I try and hide my work in progress stuff till it's more done, as I think it's more interesting that way. I'm sure I'm going to run out of tricks and have to post half done stuff soon enough.


On to the project! I love my set of battlefield in a box badlands rocks. I used them in my gruntz game recently and they are super cool. Unfortuntely, I don't have enough to get the coverage I want at the density that makes sense. Even more criminal, is that they are now discontinued. Obviously they are popular because you really can't find anyone selling them anymore, unlike a lot of the sets.


Stuart at Dust, Tears & Dice made some cool hills for his starship troopers campaign. His use of moponi wood made a light come on in my head as I had some from my fishtank which, long since decomissioned, I'd gotten rid of lately. Hammer in had I bashed up the big peices into smaller stuff and hot glued it to CD's.


I wanted to try and match the color to the bluffs. I'm fairly new to the airbrush thing, so I think I reversed the order of the paint. I used a red oxide first, which was very red, and then hit it with a brown. Probably it would have worked out better the other way, as the red would pop more than it does (on it's own it was too monochrome and red). A learning experience for sure.


The craft paint ended up a bit dry and flecky as well. Not sure if it was underthinned, or at the wrong pressure or what. I suspect it's just crappy paint though. This is definitely still mysterious.

One of the other snafus is that two spires are quite tall. I really like the look.....but it's too tall for the drawer I keep all the other stuff in. Now I need to ponder another storage option. Oh well.

Kinda crap photos, I need to find a large backdrop I think.

Wednesday, September 18, 2013

Good Fences make good neighbours

Final product post varnishing
...or in wargames make you harder to hit. I managed to crank these out earlier in the summer, but haven't gotten around to posting pictures yet. All part of a push to get some 28mm terrain painted up and ready for gaming.


The original impetus was some skirmish gaming, but perhaps I may try form more warhammer fantasy battle. I do face some challenges with a table surface right now though, living in a small apartment. I probably need to make a push to rectify this before the weather gets extra gross.


Base color minus the trees
The pallet uses the same grey from the tower I painted before. I hope it doesn't get too endlessly grey but we'll see. I also didn't like the trees are brown idea. I decided to attempt to do a birch tree, which perhaps wasn't so smart with the grey stone fencing, but hey, gotta break out of the known occasionally.


Birch trees done, inking and detailing


I'm reasonably happy with how things turned out. Once I got some other colours on there (the nail heads, the green on the basing, the static grass, the rust) it looks better.


More rusting with my favorite 'paint'
I'm not super impressed with my colour choice for the ground. I've based minis this way before and it worked.....perhaps I slathered on the top colour too heavily. It improved once the static grass was on there though.


The silvering of the nails definitely helped the fencing to 'pop'. It was a bit drab prior, but after the final touches it totally helps. I think this illustrates the effects that a small differing colour on the palette can have. Hopefully I remember this for other models I paint that I'm trying to figure out why they aren't looking great.


I also attempted some object oriented lighting with the lantern in the sign post. This probably would have gone better, but I've also never painted flame. Note to self: attempt one brand new thing at a time. The colours in the lantern are a little screwey....which means the light cast is as well. This would be a given as I did the effects at the same time to simplify the colour matching. I'm trying to decide what to do about this one: don't use it, live with it, is it redeemable?

Thankfully it is fairly small, so the horrors don't jump out too much on a large table. I'll obviously need to practice my flame painting again soon. It totally didn't help with the shape of the lantern (the metal banding was a problem.